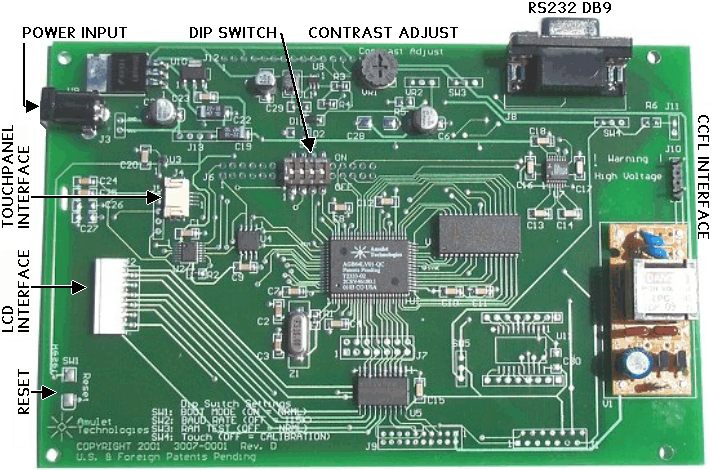
Figure 1. CB-GT570 Controller Board, Component Side.
This page provides hardware and electrical documentation for the Easy GUI LCD Controller Board Rev. D, part number CB-GT570. This is the same LCD controller board integrated with the Easy GUI 5.7" LCD Starter Kit (STK-GT570) and the Easy GUI 5.7" LCD Module Kit (MK-GT570). References to software in this document refer to the Amulet HTMLCompiler. For software documentation please see: http://www.amulettechnologies.com/help/compiler.htm.
The Amulet Easy GUI controller board is software configurable to drive any
size monochrome LCD, up to full VGA (640x480).
The CB-GT570 controller board is ideal for interfacing to a graphics display
with CCFL backlighting. For more detail on interfacing to the controller board,
click on the following topics:
Figure 1. CB-GT570 Controller Board, Component Side.
| PCB Size: | 6.50" x 4.25" |
| LCD*: | Negative-type display, 4.87" x 3.70" (5.7" diagonal); 320 x 240, monochrome, dark blue and white ; viewable area 4.76" x 3.61" (121.0 x 91.6mm) |
| Dot Pitch*: | 0.36 x 0.36mm |
| Dot Size*: | 0.33 x 0.33mm |
| Touchpanel*: | 4-wire resistive analog; active area is 118.57 x 89.77mm; utilizes full 320 x 240. NOTE: Since the touchpanel is touch activated, do NOT allow your mounting hardware to apply any compression forces inside the active area! |
| Backlight*: | CCFL, always ON. |
| Operating Temp*: | 0° to 45°C; 95% RH Max. |
| Storage Temp*: | -25° to 60°C |
| Power: | 12 VDC @ 250mA |
| SRAM: | 128k-Bytes |
| FLASH: | 128k-Bytes (64k-Bytes available) |
| Serial Port: | RS-232, 9-pin DIN, up to 115.2 Kbps |
The timing diagram shown below assumes:
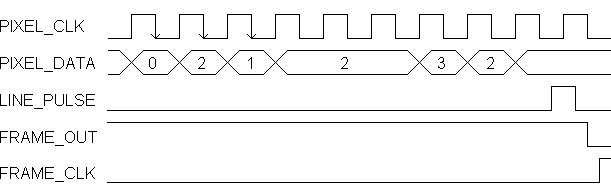
Figure 2. Timing Diagram

Figure 3. 320x240 Dot Matrix Display Pattern
e
Headers J1, J2, and J9 provide three alternatives for LCD interface. The Easy GUI Controller Board ships with a 12-pin low insertion force connector installed in header J2. Headers J1 and J2 are pre-routed with a positive drive voltage (variable +17 to +23 VDC). If your display requires a different drive voltage (negative or positive), you must supply this voltage externally. (Contact us: support@AmuletTechnologies.com for more info.) Also, the LCD signals to the interface headers are CMOS level signals. If your LCD requires TTL signals, contact us (support@AmuletTechnologies.com) for simple board modification instructions.
| Pin # | Signal | Description |
| 1 | D0 | Pixel_D3: LCD pixel data |
| 2 | D1 | Pixel_D2: LCD pixel data |
| 3 | D2 | Pixel_D1: LCD pixel data |
| 4 | D3 | Pixel_D0: LCD pixel data |
| 5 | DISP OFF | LCD_Pwr ("H": On; "L": Off): Display control signal |
| 6 | FLM | Frame_Out: Frame signal (LCD first frame synchronization) |
| 7 | NC | No Connect |
| 8 | LP(CL1) | Line_Pulse: Pixel data latch signal |
| 9 | XCK(CL2) | Pixel_Clk: Pixel data shift clock |
| 10 | VDD | Power Supply (+5V) |
| 11 | VSS | Ground |
| 12 | VEE | LCD Driving Voltage (+17 ~ 23V): Positive LCD driving supply |
| 13 | VADJ | N/A |
| 14 | FGND | Frame Ground |
| Pin # | Signal | Description |
| 1 | S | Frame_Out: Frame signal (LCD first frame synchronization) |
| 2 | CP1 | Line_Pulse: Pixel data latch signal |
| 3 | CP2 | Pixel_Clk: Pixel data shift clock |
| 4 | NC | No Connect |
| 5 | DISP OFF | LCD_Pwr ("H": On; "L": Off): Display control signal |
| 6 | D0 | Pixel_D3: LCD pixel data |
| 7 | D1 | Pixel_D2: LCD pixel data |
| 8 | D2 | Pixel_D1: LCD pixel data |
| 9 | D3 | Pixel_D0: LCD pixel data |
| 10 | VDD | Power Supply (+5V) |
| 11 | VSS | Ground |
| 12 | VEE | LCD Drive Voltage (+17 ~ 23V): Positive LCD driving supply |
| Pin # | Signal | Description |
| 1 | VH | Power Supply (+12V) |
| 2 | VH | Power Supply (+12V) |
| 3 | GND | Ground |
| 4 | NC | No Connect |
| 5 | VL | Power Supply (+5V) |
| 6 | GND | Ground |
| 7 | VS | Frame_Out: Frame signal (LCD first frame synchronization) |
| 8 | GND | Ground |
| 9 | HS | Line_Pulse: Pixel data latch signal |
| 10 | GND | Ground |
| 11 | VCLK | Pixel_Clk: Pixel data shift clock |
| 12 | GND | Ground |
| 13 | VD0 | Pixel_D3: LCD pixel data |
| 14 | GND | Ground |
| 15 | VD1 | Pixel_D2: LCD pixel data |
| 16 | GND | Ground |
| 17 | VD2 | Pixel_D1: LCD pixel data |
| 18 | GND | Ground |
| 19 | VD3 | Pixel_D0: LCD pixel data |
| 20 | GND | Ground |
Header J6 provides a means of interfacing to the Amulet chip.
|
Pin # |
Signal |
Description |
|
1 |
RESET |
System Reset (active low ) |
|
2 |
SCLK |
SPI Clock |
|
3 |
MOSI |
SPI Data Out (MOSI) |
|
4 |
MISO |
SPI Data In (MISO) |
|
5 |
SS2 |
SPI Slave Select (line 2) |
|
6 |
SS3 |
SPI Slave Select (line 3) |
|
7 |
SS4 |
SPI Slave Select (line 4) |
|
8 |
SS5 |
SPI Slave Select (line 5) |
|
9 |
SS6 |
SPI Slave Select (line 6) |
|
10 |
SS7 |
SPI Slave Select (line 7) |
|
11 |
IRQ |
Touch Panel Interrupt |
|
12 |
GND |
Ground |
|
13 |
GND |
Ground |
|
14 |
GND |
Ground |
|
15 |
BOOT |
System Power Up Mode ( 1 = Program, 0 = Normal ) |
|
16 |
GND |
Ground |
|
17 |
BAUD |
Flash Baud Rate ( 1 = 11500, 0 = 19200 ) |
|
18 |
GND |
Ground |
|
19 |
RAM |
RAM Test ( 1 = Normal, 0 =TEST ) |
|
20 |
GND |
Ground |
|
21 |
T_CAL |
Touch Panel Calibration ( 0 = Normal, 1 = CALIBRATE ) |
|
22 |
GND |
Ground |
|
23 |
GND |
Ground |
|
24 |
GND |
Ground |
|
25 |
TXD |
UART Transmit Data U1 Side |
|
26 |
RXD |
UART Receive Data U1 Side |
|
27 |
TXD |
UART Transmit Data U7 Side |
|
28 |
RXD |
UART Receive Data U7 Side |
|
29 |
GND |
Ground |
|
30 |
GND |
Ground |
|
31 |
TXD IN |
Transmit Data J8 Pin2 DB9 |
|
32 |
RXD IN |
Receive Data J8 Pin3 DB9 |
WARNING: Electrical
shock hazard! Do not touch the CCFL inverter with power
applied to the board. Doing so can shock and burn you.
The Easy GUI controller board comes equipped with an inverter for driving a CCFL backlight via 2-pin header J10.
|
|
Pin # | Signal | Description |
|
1 |
OUT1 | Power supply for CCFL backlight (HOT) | |
| 2 | OUT2 | Power supply for CCFL backlight (GND) |
Table 6. CCFL Interface Connector J10
The Easy GUI controller board includes a built-in touchpanel decoder chip (U2). Headers J4 and J5 provide two touchpanel interface options. The board ships with a 4-pin ZIF (zero insertion force) connector installed in J4.
| Pin # | Signal | Description |
| 1 | X- | X- Position Input |
| 2 | Y+ | Y+ Position Input |
| 3 | X+ | X+ Position Input |
| 4 | Y- | Y- Position Input |
Touchpanel calibration data is stored in FLASH ROM as part of the Amulet Operating System (OS). Therefore, always recalibrate the touchpanel after restoring or updating the OS. To perform a touchpanel calibration, proceed as follows:
Switch 1 ON -- Boot Mode
Switch 2 OFF -- Flash Mode Baud Rate
Switch 3 OFF -- RAM Test
Switch 4 OFF -- Touchpanel Mode
Touchpanel calibration can also be entered via software, by using the Amulet:calibrate() function call.
NOTES:
The Easy GUI controller board comes equipped with a 2.5 mm external power connector (J3). The power requirement is 12 VDC @ 250 mA. A reset switch (momentary pushbutton, SW1 on the back of the board) resets the Easy GUI controller chip as well as LCD power.
|
|
CAUTION: Do not reverse the polarity on the power input. |
The Easy GUI controller board can be powered up in different modes via the settings of the DIP switch (SW2). Some of the power up modes include: programming mode, run mode, RAM test mode, and touchpanel mode.
|
|
Switch 1 -- Boot Mode Switch 2 -- Flash Mode Baud Rate Switch 3 -- RAM Test Switch 4 -- Touchpanel Mode |
Boot Mode (Switch 1) -- This switch is monitored during a reboot to determine the operational mode of the controller board; ON is the normal mode and OFF is the FLASH program mode. Upon clicking on the Program FLASH button in the Compiler window, the Compiler will attempt to send out an auto "wake-up" message to the Amulet controller. If the page currently being displayed is set up to use the same baud rate using the META tag (if META is not present, the default is 115200) as the Compiler's uP comm rate, then the Amulet controller will change to a generic "Please wait while programming flash..." screen and commence programming. If the page has a baud rate different than what the Compiler is set to, then you should set the uP comm rate in the Settings->RS232 dialog box to match the baud rate set by the META tag. This will allow the HTMLCompiler to wake up the Amulet at one baud rate and then program it at another baud rate. The only time you should have to set Switch 1 to OFF (program mode) is when the project you compiled locks up the Amulet OS to the point where it won't accept the wake up message or if the Amulet OS has been corrupted and you need to reload the OS.
Flash Mode Baud Rate (Switch 2) -- This switch sets the baud rate used during a Flash Reprogram. The ON position sets the hardware to 19,200 baud; OFF sets the hardware to 115,200 baud. This setting must match the baud rate selected in the Easy GUI HTMLCompiler software.
RAM Test (Switch 3) -- Turn this switch ON and then reboot the controller board to auto-execute a RAM test. A RAM test failure will result in a zero (0) volt signal on the MEM PASS test pad on the board; a pass will result in a 3.3 volt signal. The switch must be returned to the normal mode (OFF) before the next reboot to continue normal operation.
Touchpanel Mode (Switch 4) -- This switch should remain ON during normal operation. Turn this switch OFF and then reboot the controller board to begin a touchpanel calibration. The controller will display a series of three calibration targets. Use a stylus to touch the center of each target. If necessary, the controller will repeat the calibration. When calibration is complete, the controller will return to normal operation. The switch must be returned to the normal mode (ON) before the next reboot to continue normal operation.
NOTES:
By default, the Easy GUI controller board ships with a positive DC/DC converter with a variable output of +17 to +23VDC (variable by rotating the contrast adjust potentiometer VR1). Not all LCD's require a positive LCD driving voltage (see LCD Interface section above for more information). To have the Easy GUI controller board generate a negative LCD driving voltage having a variable output of -15.5 to -23VDC (variable by rotating the contrast adjust potentiometer VR1), proceed as follows:
| Part Reference | Package | Description | Manufacturer | Manufacturer Part # |
| C28,C29 | 1206 | CAP, .22uF, 16V, Z5U, 20% | Panasonic | ECP-U1C224MA5 |
| D2 | SOD-123 | Diode, Schottky, .5A, 20V | On Semi | MBR0520 |
| U8 | SOT-23 | Negative DC/DC Converter | Linear Technology | LT1617ES5 |
| R3 | 0805 | RES, 560K, 1/10W, 5% | Panasonic | ERJ-6GEYJ564V |
| R4 | 0805 | RES, 33K, 1/10W, 5% | Panasonic | ERJ-6GEYJ333V |
NOTES:
A serial connection is required between the controller board and a personal computer in order to program uHTML pages into the FLASH memory of the controller board.
The serial parameters for communications between the Easy GUI client and the server are, as follows:
Baud Rate: 9600, 19200, 57600, or 115200bpsSee Communications Protocol for more information.
Parity: None
Data Bits: 8
Stop Bits: 1
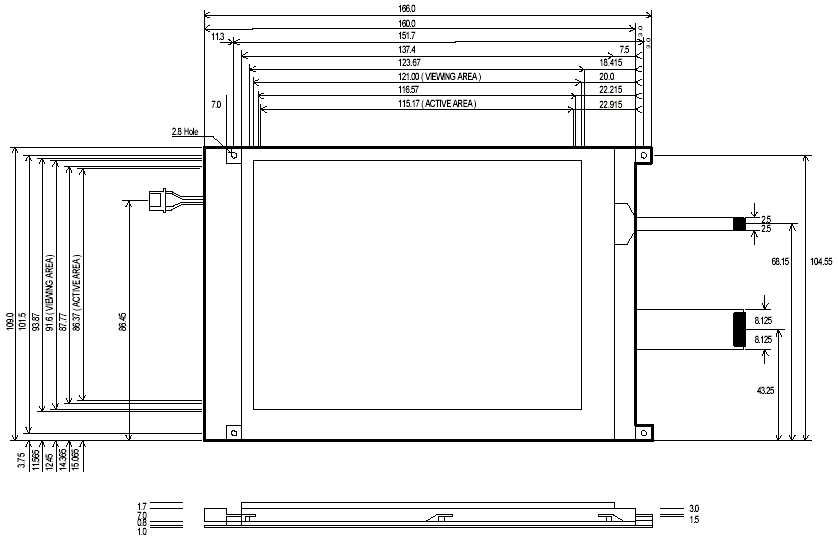
Click here for the .pdf version of the Mechanical Drawing for the 5.7" Module Kit.