Using Amulet's HTMLCompiler
The Amulet HTMLCompiler compiles HTML and image files into a single compact µHTML project. Additionally,
µHTML projects may be saved to a file (with a .uht or .pdb extension) or programmed into the flash
memory of an Amulet
module.
For more detail on using the HTMLCompiler, click on the following topics:
- Starting the HTMLCompiler,
- Compiling a collection of HTML files,
- Saving a µHTML project,
- Loading a previously saved µHTML project,
- Saving a screenshot of the currently displayed uHTML page,
- Setting up the RS232 port for flash programming,
- Setting up the LCD Characteristics,
- Specifying the size of the installed flash,
- Programming a µHTML project into the Amulet module's flash memory,
- Restoring the Amulet module flash to the factory configuration,
- Updating or Restoring Amulet OS Files,
- Updating Amulet OS Files on module with no touchpanel,
- Creating a "production ready" single
file comprised of both a project and an OS,
- Customizing OS Screens,
- Status and Error Messages,
- Menus: File, Settings, Help
Starting the HTMLCompiler
HTMLCompiler runs on Windows 95, 98, ME, XP and NT 4.0 or later. HTMLCompiler may be invoked by any standard Windows method:
- From the Windows START menu,
- Double clicking on
- the HTMLCompiler icon,
- any *.uht file icons,
- any shortcut icons.
- From the DOS command line. If executing from the DOS command line, a pre-compiled *.uht file may be optionally
specified as follows:
C:\Program Files\Amulet\HTMLCompiler file.uht
In the above case, file.uht will be automatically loaded and prepared for flash programming.
Compiling a collection of HTML files
Like most websites, most µHTML projects contain multiple pages. However, all action starts at the "home
page". In a µHTML GUI, the home page is the first page that is displayed on the Amulet LCD after boot
up. Since all other display pages can be traced back to the home page through hypertext links, the HTMLCompiler
can build a complete µHTML project by starting with the HTML file for the home page.
To create a µHTML project:
- From the HTMLCompiler's File menu, select Open. You will be presented with a file dialog box
similar to the one pictured below.
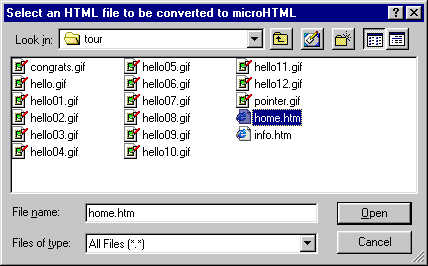
- Use the controls in the file dialog to navigate to the folder that contains the HTML file of your home page.
- Select your home page and click the Open button. The HTMLCompiler will open and compile your home page
and any other file that is linked from your home page. If successful, the HTMLCompiler will display:
<Successful Compile! Ready to Program 19 files (3136 bytes) into Flash>>
Saving a µHTML project
You may save the results of a successful compile to a file. All µHTML projects should be saved to files
with either the .uht or .pdb extension. You can use any other extension, but the HTMLCompiler will ONLY load projects saved with
the .uht or .pdb extension.
To save a µHTML project:
- From the HTMLCompiler's File menu, select Save. You will be presented with a file dialog box.
- Use the controls in the file dialog to navigate to the folder where you want to save your µHTML project.
- If the default file name is acceptable, click the Save button. If you wish to specify a different file
name, remember that the extension MUST be .uht!
Loading a previously saved µHTML project
You may reload the results of any pre-compiled µHTML projects that have been saved to a file with a .uht
extension. NOTE: the HTMLCompiler will ONLY load projects saved with the .uht extension.
To load a µHTML project:
- From the HTMLCompiler's File menu, select Open. You will be presented with a file dialog box.
- Use the controls in the file dialog to navigate to the folder that contains the *.uht file of your previously
compiled µHTML project.
- Select your µHTML project and click the Open button. The HTMLCompiler will open the µHTML
project and prepare it for programming into the flash memory of an Amulet module.
Optionally, you may double click on any file with the .uht extension. Windows will automatically launch the
HTMLCompiler and load the *.uht µHTML project.
Also, if executing from the DOS command line, a pre-compiled *.uht file may be optionally specified as follows:
C:\Program Files\Amulet\HTMLCompiler file.uht
In the above case, file.uht will be automatically loaded and prepared for flash programming.
Saving a screenshot of the currently displayed uHTML page
You can use the HTMLCompiler to save the contents of the currently displayed uHTML page on an Amulet powered display. The HTMLCompiler will only allow you to save the screenshot with a .bmp extension. If you try to use any other extension like a .gif, then the HTMLCompiler will not save the screenshot.
To save a screenshot:
- Connect one end of the 9-pin serial cable to the serial connector on the Amulet module and the other end to the assigned serial port on your PC.
- Apply power to the Amulet module.
- On the Amulet module, navigate to the uHTML page you wish to upload and save.
- From the HTMLCompiler's File menu, select Upload Image. The HTMLCompiler will request a screenshot from the Amulet module and you will be presented with a file dialog box.
- Use the controls in the file dialog to navigate to the folder where you want to save your screenshot image and remember that the extension MUST be .bmp!
Note, the Upload Image function assumes you are dealing with a 320x240 sized
display at 115200 baud. If your display is a different size, you need to modify
one of the current OS files. Here are the steps needed to allow a 480x320 display
perform an image upload.
- Find the directory Amulet\Projects\OS Files
- Copy the file ScreenDump.ahtml and name it ScreenDump480x320.ahtml
- Open ScreenDump480x320.ahtml in notepad or another text editor.
- Find the line that reads <P><APPLET
CODE="Scribble.class" WIDTH="320" HEIGHT="240"
ALIGN="BOTTOM" name="Scrib1" codebase="\">
- Change the Width to 480 and the Height to 320.
- Save ScreenDump480x320.ahtml
- Open ScreenDump480x320.ahtml in the HTMLCompiler and program into your
Amulet module.
If you are programming your Amulet module at 19200 instead of 115200,
then you will need to modify ScreenDump.ahtml as well. Here are the steps you
need to allow the Upload Image to work at 19200.
- Find the directory Amulet\Projects\OS Files
- Copy the file ScreenDump.ahtml and name it ScreenDump19200.ahtml
- Open ScreenDump19200.ahtml in notepad or another text editor.
- Find the line that starts with <META
NAME="Amulet" CONTENT="baud=115200...
- Change the baud to 19200
- Save ScreenDump19200.ahtml
- Open ScreenDump19200.ahtml in the HTMLCompiler and program into your
Amulet module.
Setting up the RS232 port for flash programming
The HTMLCompiler uses an RS232 port on your PC to program the flash memory of your Amulet
module. Prior to programming, for the first time, you must select a comm port, select the programming and auto "wake-up" baud rates. The HTMLCompiler stores these settings in its Amulet.ini file so that they can be recalled each time you launch the HTMLCompiler.
To select a serial port for programming:
- From the HTMLCompiler's Settings menu, select RS232. You will be presented with an RS232 dialog
box similar to the one pictured below.

- Next, select any available serial port from the Comm Port list. All ports listed in your Windows Registry
will be listed.
- Then, choose a baud from the Flash Rate list. On the 5.7"
module, the flash rate must match the bit rate selected by DIP Switch 2 of the Amulet
module. If you selected 115200, be sure to place Switch 2 in the OFF position. If you selected 19200, be sure to place Switch 2 in the ON position.
On the 3.8" module, the flash rate is set by the
factory to 115200. To change to 19200, see the 3.8" hardware documentation.
- Now choose a baud from the uP Comm Rate list. The HTMLCompiler will use the uP comm rate to send out the "wake-up" message to the Amulet controller during a programming session. In order to use the auto "wake-up" feature, the uP comm rate baud needs to match the baud rate used by the META tag (if META is not present, the default is 115200) of the currently displayed uHTML page on the Amulet display.
- Finally click the OK button.
Setting up the LCD Characteristics
The HTMLCompiler has added a new feature which adds support for different size LCD's. Prior to programming for the first time, you must specify and program the LCD characteristics of the exact display you'll be using, only if using a display other than the one Amulet supplied in the starter kit or module kit. The HTMLCompiler stores the LCD settings in individual .ini files located in \Displays\ subdirectory of the Amulet main directory.
To select a different size LCD:
- From the HTMLCompiler's Settings menu, select LCD. You will be presented with an LCD dialog box
similar to the one pictured below.
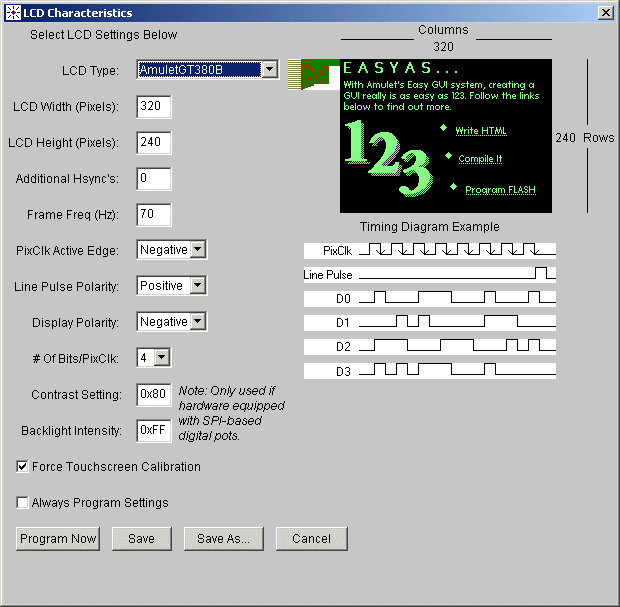
- Select a display from LCD Type. If the display is listed, then all the LCD settings will be automatically filled in for you upon selecting the display. Steps 4 - 10 are useful if your
display is not listed under LCD Type. You can go directly to Step 10 if you selected a supported display from the LCD Type options list.
- If the display you're using is not listed under LCD Type, either
choose OtherLCD and fill in the values of the LCD settings manually, or
select an LCD from the drop down list which is similar in characterstics
to your display, make the appropriate changes, and select the Save As...
button to give your LCD a unique name.
- Type in the width of the LCD in pixels (# of columns) and the height of the LCD in pixels (# of rows).
- For Additional Hsync's, leave the value set to zero since it is for internal use only.
- Next, type in the Frame Frequency. Consult the LCD manufacturers datasheet if you're not sure which value to
input here.
- Choose a polarity for the Pixel Clock Active Edge and Line Pulse from the appropriate lists. Changing
the polarity in either list box will change the output in the Timing Diagram Example to reflect what the signals
would look like if you were to look at them using a scope.
- Select a Display Polarity. The display polarity can normally be found in the general specifications of the LCD's datasheet. Choosing a positive polarity means that when the pixel data is high, the pixel is turned on in the display. Choosing a negative polarity means that when the pixel data is low, the pixel is turned off on the display. Unfortunately, not all display manufacturers follow this nomenclature, so you may want to try it both ways to see which polarity looks best for the particular display you're using. Changing the polarity will change the LCD image to reflect the polarity of the pixels.
- Now, choose the number of data lines required by the LCD from the # Of Bits/Pixel Clock list box. Changing
the number of bits from the list box will change the output in the Timing Diagram Example.
- Select a Contrast Setting. This is only applicable on LCD modules equipped
with an SPI-based digital pot used to adjust the contrast setting. The range
is 0x00-0xFF. This value will be used to initialize the contrast setting
upon powering the module. The contrast can still be adjusted during runtime.
See Software Controlled Contrast and Backlighting
documentation for more information.
- Select a Backlight Intensity. This is only applicable on LCD modules
equipped with an SPI-based digital pot used to adjust the backlight intensity.
The range is 0x00-0xFF. This value will be used to initialize the backlight intensity
upon powering the module. The backlight intensity can still be adjusted
during runtime. See Software Controlled Contrast
and Backlighting documentation for more information.
- Checking the Force Touchscreen Calibration box will force the Amulet
to go into its touchscreen calibration routine before displaying your project.
The touchscreen calibration routine will only be launched once after hitting
the Program Now button unless the Always Program Settings checkbox
is checked as well. In that case, the touchscreen calibration routine will
be launched every time you download uHTML pages into the Amulet module.
- Checking the Always Program Settings box will program this LCD configuration
every time the Program Flash button on the HTMLCompiler is hit. Typically,
the LCD settings only need to be entered into the Flash once after loading
the OS since the LCD settings actually reside within the OS space of the
flash. Writing new projects to the flash will not write over the LCD settings.
Another thing to note is that if the Always Program Settings box is selected,
the LCD settings are also saved in the resultant .uht or .pdb file. This
allows you to customize a project or an OS specific to a particular display.
For instance, by default, the .uht OS file comes with a negative polarity,
but if your LCD module is a transflective display with positive polarity,
you can modify the Display Polarity to use a positive polarity and then
select the Always Program Settings box. You would then Open the .uht OS
file in the HTMLCompiler and then save the file as another separate .uht
file which can now be your custom OS file.
- Finally, click the Program Now button to program the new LCD settings into the Amulet
module. You really only need to program the LCD settings into the Amulet
module once, unless you begin using a different size LCD.
NOTES:
- Clicking the Program Now button will program the current LCD settings and will automatically save the LCD settings in an .ini file with the selected display in LCD Type as the name of the file. The only exception to the autosave feature of the Program Now button is if you have OtherLCD selected for LCD Type. Clicking on Program Now while having OtherLCD selected as the LCD Type will only program the LCD settings and NOT save the LCD settings.
- Clicking the Save button will save the LCD settings in an .ini file with the selected display in LCD Type as the name of the file and then close the LCD Characteristics window. For example, if AmuletGT380B is
selected for LCD Type and the Save button is pushed, the current LCD settings will be saved in a file called AmuletGT380B.ini in the Displays folder
and the LCD Characteristics menu window will close without programming the settings into the Amulet module. If you have OtherLCD selected for LCD Type and you click on Save, then a pop-up message will appear awaiting for you to specify a file name, with no extension, to save the LCD settings to before closing the LCD Characteristics window.
- If saving a new LCD Type, the name must not contain any spaces. For
example, Half VGA is not a valid name, but Half_VGA is valid.
- If you decide to use a different size LCD, be sure to create your HTML pages with this in mind by setting the
table to the new width and height of the LCD.
Specifying the Size of the Installed Flash
The Amulet OS and your compiled project both reside in the installed serial
data flash on board the Amulet module. If your project becomes larger than
the size of your flash can handle, the HTMLCompiler will display a warning message.
The serial data flash can be upgraded from 1MBit to either a 2MBit, 4MBit or
8MBit part. If your Amulet module has a larger sized serial data flash, then
you can specify your actual flash size to keep the warning message from
showing up when not appropriate.
To specify the size of the flash installed in your Amulet module, select
Flash Size from the Settings menu of the HTMLCompiler. Choose
the appropriate size (1MBit, 2MBit, 4MBit or 8MBit) and press the OK button.

Note: This will not change the size of the flash installed in your Amulet
module. The size specified here should reflect the size of the installed serial
data flash module.
Customizing the Look of the HTMLCompiler
Menu: Settings > HTMLCompiler Preferences
The HTMLCompiler Preferences menu allows you to customize the colors
that are used in displaying the HTMLCompiler, the size of the border around
the console window and also allows you to add "Save .pdb" and "Save
.uht" buttons.

Color Preferences:
The background, the text and the frame can all be set to one of 13 colors.
A sample of what your choices will look like is displayed in the right hand
side of the menu. Be aware that if you choose the same color for the background
and the text that you will not be able to see any text in the console window.
Layout Preferences:
By selecting the Minimal Frame checkbox, only a small border along the bottom
will appear on the HTMLCompiler. This merely changes the look of the HTMLCompiler.
You can see the difference a border makes by looking at the sample to the right.
You can also enable the "Save .pdb" button and/or the "Save
.uht" button. After a successful compile, these buttons will appear along
the bottom of the HTMLCompiler, thus allowing for quick saving of a .uht or
.pdb file. These buttons will create a .uht or .pdb file with the same name
as the name of the file chosen to compile. They will not give you a chance to
save the files as a different name and they will write over any existing file
of the same name without giving you a warning message.
If you are happy with your changes, then select the OK button. If you want
to disregard the changes you made, select the CANCEL button. If the OK button
is selected, the Preferences menu is closed down and the HTMLCompiler will now
reflect the changes that you entered.
Programming the Amulet's flash memory
By default, the Program Flash button is disabled. To enable the button you must either compile
a project or load a previously compiled project.
To program the Amulet's Flash memory:
- Remove power from the Amulet controller board. If you have a 3.8"
module, ensure Boot M is jumpered in J2. If you have a 5.7" module,
make sure that the controller board DIP switch settings on
SW2 are, as follows:
 |
Switch 1 (Boot Mode) = ON (normal) (*See
Note below)
Switch 2 (Program Baud Rate) = OFF (115200) or ON (19200)
NOTE: This must match the bit rate set for the compiler.
Switch 3 (RAM Test) = OFF (disabled)
Switch 4 (Touch Panel Mode) = ON (Normal operation) |
- Connect one end of the 9-pin serial cable (included with the starter kit) to the serial port (J2) on the controller
board and the other end to the assigned serial port on your PC.
- Apply power to the Amulet controller board. The module should power up and the
last programmed project should be displayed.
If not, recheck the DIP switch settings on the board.
- Finally, Press the Program Flash button.
* Note: Upon clicking on the Program Flash button in the Compiler window, the Compiler will attempt to send out an auto "wake-up" message to the Amulet controller. If the page currently being displayed is set up to use the same baud rate using the META tag (if META is not present, the default is 115200) as the Compiler's uP comm rate,
then the Amulet controller will change to a generic "Please wait while programming flash..." screen and commence programming. If the page has a baud rate different than what the Compiler is set to, then you should
set the uP comm rate in the Settings->RS232 dialog
box to match the baud rate set by the META tag. This will allow the HTMLCompiler
to wake up the Amulet at one baud rate and then program it at another baud
rate. The only time you should have to put the Amulet into program mode (DIP
Switch 1 to OFF on the 5.7" or Boot M not jumpered on the 3.8")
is
when the project you compiled locks up the Amulet OS to the point where it won't
accept the wake up message or if the Amulet OS has been corrupted and you need
to reload the OS.
NOTES:
- If the selected serial port is already open and in use by another application, the compiler will abort the
Flash programming cycle and display the "Port is in use" error message. In this case, either close the
conflicting application, or select a different serial port.
- If the compiler doesn't see the controller board, the compiler will display the "Serial port timed out"
error message. Recheck the DIP switch settings, the serial cable connections and the power connections, then try
again. You might also try a different baud rate.
Restoring The Flash to The Factory Configuration
You may, at anytime, restore the Amulet flash memory to the original factory configuration.
- First load the file home.html from the \projects\EasyAs123\
subdirectory of the Amulet main directory. By default, the Amulet main directory
is C:\Program Files\Amulet, however you may have specified a different path
during the install.
- Next, program the file into Amulet flash.
Updating or Restoring Your Amulet OS
If you are updating from a previous version of Amulet software you MUST update your
firmware.
Follow the steps below if your Amulet no longer seems to work correctly. If
your module does not have a touchpanel, see section
below.
- First load the file AmuletOSv3.2.uht from
the \binaries\ subdirectory of
the Amulet main directory. By default, the Amulet main directory is C:\Program
Files\Amulet, however you may have specified a different path during the install.
- If the Amulet is currently "dead", put the Amulet module in
program
mode (DIP switch 1 to OFF in the 5.7" or remove the Boot M jumper in
the 3.8") and hit the reset button.
- Next, program the file into Amulet Flash.
After the OS is successfully loaded, the touchpanel calibration routine
will appear. After successfully calibrating the touchpanel, a screen allowing
the setting of the display polarity appears. Hit the button to the right
to toggle the display polarity.
Loading the Amulet OS For LCDs Without A
Touchpanel
If you are updating a module that does not have a touchpanel, then you'll
need to load the file AmuletOSv3.2_NT.uht instead of AmuletOSv3.2.uht.
The regular OS requires touchpanel calibration upon loading. The _NT file does
not have this requirement.
After loading the "No Touchpanel" OS, if you need to change the
polarity, you obviously won't be able to change it through the LCD, since you
can't use the touchpanel to select the ""Toggle Display Polarity"
button, but you can by going into the LCD Settings menu and either selecting
your specific LCD from the list of LCD Types, or you can create your own custom
LCD settings, including the display polarity and save that LCD type. After
selecting the LCD settings for your specific display, you can then hit the Program
Now button.
Make sure that the "Force Touchscreen Calibration" checkbox is
unchecked, otherwise you will be forced to run the touchscreen calibration before
displaying anything else.
Creating a "Production Ready" File Comprised of
Both a Project and an OS
When going into production, it is often desirable to program a single file
into the production units. Amulet provides you with the ability to combine your
project with a raw OS file. A raw Amulet OS file contains all the same files
as the regular Amulet OS, without the initial project which shows
the version number of the Amulet OS and gives you the ability to change the
polarity of the display. To use the raw Amulet OS file, you must provide it
with a project to start up with. To see a comprehensive example on doing this,
click here for the CustomOS example.
You can combine multiple .uht files by creating
an Amulet script file, which is a text file with a .AmuletOS extension. You then
open this .AmuletOS file in the HTMLCompiler and save the results as a .uht
or .pdb file.
.AmuletOS files need to contain the name of a project previously saved
as a .uht file along with the name of a raw Amulet OS file. The final line should
contain NoFontHdr. All folders are relative to the folder containing
the .AmuletOS file.
NOTE: A raw Amulet OS file contains all the files needed for the OS, but
no initial project. It should never be loaded by itself. It should only be used
in conjunction with another project and packaged together via a .AmuletOS file.
Conversely, you should never try to package a full Amulet OS file with another
project in a .AmuletOS file.
Here is an example of a custom .AmuletOS file for a fictitious project named
ACME. Assume ACME.uht and ACME.AmuletOS reside in the Amulet\projects\ACME
folder.
..\..\binaries\AmuletOSv3.2_RAW.uht
ACME.uht
NoFontHdr
Notice that we're using the raw OS file found in the Amulet\binaries
folder. The directory containing the .AmuletOS file is considered the root
directory and everything else is relative to the root inside of the .AmuletOS
file. Opening this .AmuletOS file in the HTMLCompiler combines the raw OS file
with the pre-compiled project, which you can then save as a single .uht or .pdb.
By default, the raw Amulet OS is set up as a 320x240 AOB3202405B. You
can also specify the characteristics that are specific to the display you are
using and packaging that information with the .uht you created from the .AmuletOS
file. By entering the Settings->LCD menu choice from the HTMLCompiler, you
can specify the following in your custom OS:
LCD size and type
Display Polarity
Frame Frequency
Choose to
Force Touchscreen Calibration upon first boot up or not
See above for more information regarding using the
LCD settings dialog. Upon setting your custom LCD characteristics, check the
Always Program Settings checkbox and hit the Save button. Now
open your .AmuletOS file with the HTMLCompiler and save as a .uht or .pdb. This
single .uht (or .pdb) will contain both the project and the OS specified in
the .Amulet OS file as well as the LCD configurations you specified in the LCD
settings dialog.
Note: After successful creation of your custom OS file, if you do not uncheck
the Always Program Setting checkbox, then every time you program the flash,
those settings will be uploaded every time. If the existing OS already has the
settings you want, there is no need to reload them. But, if the Force Touchscreen
Calibration checkbox is set as well, this will result in you needing to
recalibrate the touchscreen after every new Flash programming.
See a full example on how to use the .AmuletOS file in conjunction with the
LCD settings dialog by clicking here.
Almost all the screens that come with the Amulet OS can be customized. A
copy of all the pages which can be customized can be found under the Amulet\projects\OS
Files directory. Within the OS Files directory, there are six sub-directories.
All OS files have the extension .ahtml. Here is a synopsis of what each sub-directory
holds:
- Flashing > Contains two files, Flashing.ahtml and FlashBack.html.
Flashing.ahtml contains the screen that says "Please wait while programming
flash..." which appears whenever you program the serial data flash.
You can modify the text but you must not add any images. Flashing.ahtml
includes a link to FlashBack.html, so you only need to compiler Flashing.ahtml
and you will get FlashBack.html compiled as well. FlashBack.html is an alternate
screen that you can jump directly to which says "Please wait while
loading image..." This page is only used if updating an existing image
within the project.
- Icons > Contains one file, Icons.ahtml. This page does not,
in and of itself, get saved to the flash. But, all the images that are referenced
within this page, the ListBox up arrow, ListBox down arrow, RadioButton
empty button, RadioButton tracking button, RadioButton full button, CheckBox
empty box, CheckBox tracking box and CheckBox full box. These are the
default images which are only used if the HTMLCompiler is not able to find
the actual images which should reside within the Amulet\Configuration directory.
These should probably not be changed, since they will very rarely, if ever,
be used.
- NoMatch > Contains one file, NoMatch.ahtml. This is the screen
that appears if the version of the OS does not match the version of the
HTMLCompiler used to compile and program the latest project. Text can be
modified, but no images can be added.
- ScreenDump > Contains two files, ScreenDump.ahtml and pixel.gif.
ScreenDump.ahtml is jumped to when File
> Upload Image is chosen. If your LCD is a different size than 320
x 240, then you should modify the table size in ScreenDump.ahtml to reflect
the size of your specific LCD. This will allow you to upload an image from
the LCD and save it as a .bmp.
- touch > Contains five files, Touch.ahtml, Target1.html, Target2.html,
Target3.html, and Target2.gif. This is the touchscreen calibration
routine. The file Touch.ahtml should be compiled and programmed to flash.
Text can be modified in Target1.html, Target2.html, and Target3.html. A
different target image can be used in place of Target2.gif. It does not
have to be the exact same size as Target2.gif. The placement of the target
must be the same in Target1.html and Target2.html, meaning the target must
be in the upper left-hand corner in Target1.html and in the lower right-hand
corner in Target2.html. The target can be placed anywhere within the touchable
region in Target3.html.
- Welcome > Contains four files, welcome.htm, toggle.htm, AmuletLogo.gif,
and wrapper_Z.gif. These files comprise the initial project which gets loaded
along with the OS. They are not stored in the OS region of the data flash.
Once a new project is loaded, these files are over written. All these files
can be changed or added to without worry.
If you are creating a Custom OS, then you can modify
these files and use them in place of the files that come bundled with the OS
.uht file. Keep in mind that you will need to ensure that you program these
modified files after programming the OS .uht file. That means that the modified
OS files will need to appear after the OS .uht within the .AmuletOS script file.
Status and Error Messages
When compiling, loading, saving, or Flash programming, the HTMLCompiler provides feedback to you in two different
ways: on the Status Line, and in the Message Area
- First, the text on the title bar of the HTMLCompiler window functions as a Status Line. The status message
is of the form: Amulet HTML Compiler: status
where: status = a text description of the current status of an operation.
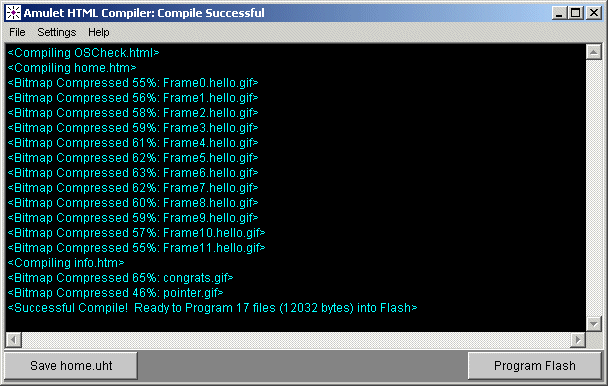
- Secondly, the large scrollable text area in the center of the HTML compiler window functions as a Message Area.
It is used by the compiler to report the success or failure of each file as it is compiled into µHTML, programmed
into flash, saved into a *.uht project file, or loaded from a *.uht project file.
Errors reported during the HTML parsing phase of compilation will have the following syntax:
ERROR: file.htm(line number) -- error message
where:
file.htm = the name of the file that caused the compile error;
line number = the last line, in file.htm, processed when the error occurred
(line numbers start from 1);
error message = description of the error.
Errors reported during any other operation will have the following syntax:
ERROR: error message
where:
error message = description of the error.
File Menu
| Open... |
Open HTML (*.htm, *.html) file to compile, or any previously compiled µHTML (*.uht) project. Brings up a
file dialog for choosing file. |
|
Open Last
|
Open the last file that was compiled and recompile it.
|
|
Save .uht
|
Save compiled project in µHTML (*.uht) format. The name is automatically
generated by replacing the extension of the file compiled with .uht.
Will overwrite an existing file with the same name without asking.
|
|
Save .pdb
|
Save a compiled project in Palm DataBase (*.pdb) format.
The name is automatically generated by replacing the extension of
the file compiled with .pdb. Will overwrite an existing file with
the same name without asking. |
| Save .uht as... |
Save a compiled project in µHTML (*.uht) format. Brings up a file dialog for choosing the name and location
to save the *.uht project file.
NOTE: Filename MUST have a .uht extension! |
| Save .pdb as... |
Save a compiled project in Palm DataBase (*.pdb) format. Brings up a file dialog for choosing the name and location
to save the *.pdb project file.
NOTE: Filename MUST have a .pdb extension! Contact Amulet
Technologies for the Palm software needed to program a .pdb project
file into the Amulet onboard Flash PROM. |
|
Program Flash
|
Programs the resultant compiled project into the Amulet's flash
memory. Same functionality as the Program Flash button in the lower
right hand corner of the HTMLCompiler.
|
| Upload Image |
Upload and save the contents of the currently displayed uHTML page on an Amulet powered LCD. |
|
1)...5)
|
Contains the names and directories of the last five pages compiled.
Selecting one of these menu choices immediately recompiles that
page.
|
| Exit |
Exit the program. |
Settings Menu
| RS232 |
Brings up the RS232 settings dialog used to configure the COM port for programming the Amulet onboard serial
data flash. |
| LCD |
Brings up the LCD characteristics dialog used to configure the
Amulet module for different size LCD's. |
|
Flash Size
|
Brings up the Flash Size dialog used to specify the size of the
flash memory installed on your Amulet module.
|
|
HTMLCompiler Preferences
|
Brings up the HTMLCompiler Skin dialog, used to customize the
look of the HTMLCompiler.
|
Help Menu
| Help... |
Brings up this help document. |
|
Check For Updates
|
Launches a browser to http://www.amulettechnologies.com/software.html
so you can check for software updates.
|
| About... |
Brings up a dialog containing information about the Amulet HTMLCompiler and about your computer. |
Amulet HTMLCompiler,
Copyright © 2000-2004 by
Amulet Technologies, LLC
Back to Welcome - Contact
Amulet - Amulet
Home